Recorded lecture transcription
Turn a permitted lecture recording into speaker-separated timeline captions, optional bilingual text, a course summary, keywords, and practical study notes.
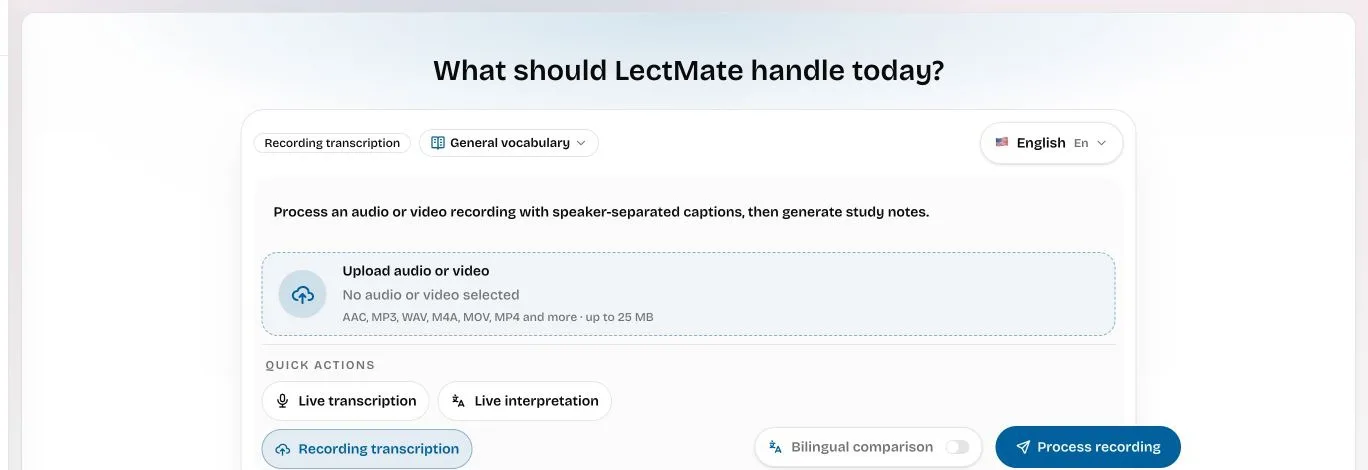
Recorded lecture transcription turns an audio or video file into a time-based transcript that can distinguish speakers and support later study. In LectMate, you upload a permitted file, choose its spoken language and course vocabulary, optionally request bilingual text, and process the recording. The result can include the transcript, timeline, summary, keywords, and study notes in one session.
Current input boundary: the upload control accepts common audio and video formats such as AAC, MP3, WAV, M4A, MOV, and MP4, with a current maximum file size of 25 MB. Check the live workspace before relying on a format or limit, because the interface is the current product contract.
The problem: a long recording is not yet study material
A lecture recording preserves sound, but it does not tell you where the key definition appears. Replaying sixty minutes to find one explanation is slow. In a seminar, several speakers may interrupt one another, and a plain text dump makes it difficult to separate the lecturer's argument from a student's question.
Manual transcription is rarely a good use of revision time. You pause, rewind, type, correct, and repeat—then still need to summarize the class. A generic audio-to-text service may produce words, but it can leave the transcript detached from course context and the audio timeline. Recorded lecture transcription should reduce the distance between a raw file and a reviewable course session.
What LectMate creates from a lecture file
The recording workflow begins in the same workspace as live transcription and live interpretation, but it is designed for a file you already have. It asks for the source language, course vocabulary, task context, upload, and optional bilingual comparison before processing.
| Input or problem | LectMate output | Study use |
|---|---|---|
| A supported audio or video file | A chronological transcript with timestamps | Locate what was said without replaying from the beginning |
| A seminar with more than one voice | Speaker-separated segments when voices can be distinguished | Follow the change from explanation to question or reply |
| A second-language recording | Optional bilingual comparison | Read the translation while keeping the source wording available |
| A long transcript | Course summary and keywords | Identify likely themes before close reading |
| Scattered ideas | Study notes connected to the session | Build a revision path without moving material among several apps |
Generated structure is a starting point, not a final academic record. Names, formulas, quotations, dates, and assessment instructions should always be checked against the recording and the lecturer's original materials.
Before upload: check the file and your permission
1. Make sure you have the right to process it
Possessing a file does not automatically mean you may upload or transcribe it. Follow the lecturer's notice, university policy, participant consent, and local law. Avoid uploading private conversations, confidential research, patient information, legal advice, or assessment material unless the relevant rules clearly allow it.
Read the privacy policy and terms before working with sensitive content. Delete the completed session when it no longer has a valid study purpose.
2. Confirm format and size
The current sender lists AAC, MP3, WAV, M4A, MOV, MP4, and other supported formats, with a 25 MB maximum. If a file is too large, shorten it with an approved tool or split it into meaningful sections outside LectMate before upload. Do not repeatedly convert a low-quality recording and expect missing speech to reappear.
Choose the clearest available source. A recording made close to the speaker, with little music and limited background conversation, gives recorded lecture transcription a better input than a distant phone recording in a noisy hall.
3. Decide whether bilingual comparison is useful
Leave bilingual comparison off when the source language is comfortable and you mainly need search-friendly text and notes. Turn it on when you want source and translated text together. Choose a target language different from the source, and expect the bilingual workflow to use the current rate shown in the workspace.
A quick file-readiness checklist
Before recorded lecture transcription begins, play the first, middle, and last thirty seconds in your normal media player. Confirm that the file contains the intended class, has audible speech throughout, and is not a silent screen recording. Check the filename and size, then note the main speaker language and subject. If the recording contains a long empty section, trim it with an approved tool before upload. If two files represent separate classes, process them separately. These checks protect credits and give each transcript a coherent topic, instead of asking one task to interpret unrelated material or missing audio.
How to transcribe a lecture recording
Step 1: choose Recording transcription
Open the LectMate workspace and select Recording transcription from the quick actions. The sender changes from a live microphone task to an upload task. This is the clearest confirmation that you are about to process a file rather than start a live session.
Step 2: set language, vocabulary, and context
Select the primary spoken language. Then choose a course vocabulary preset and describe the content in one line, such as “constitutional law seminar on judicial review.” Add important abbreviations and preferred spellings when they are genuinely part of the recording.
Good context helps recorded lecture transcription interpret specialist language, but it cannot repair inaudible audio. If the file contains several unrelated classes, split it first so each task has a coherent topic.
Step 3: upload the file
Use Upload audio or video and choose the permitted file from your device. The interface confirms the selected file and reads its duration. Check that you picked the correct class before processing—especially when several recordings have similar automatic filenames.
Step 4: choose bilingual text if needed
Enable Bilingual comparison only when a translated version will improve review. Recheck the target language. The source transcript remains important because translation can simplify or misread a technical phrase.
Step 5: process and keep the page open
Review the estimated credit cost, then press Process recording. Keep the page open while the upload and transcription run. Wait for the workspace to show the finished session; do not assume that closing the tab will continue the job in the background.
Read the result in the right order
Start with the summary to understand the outline, then scan the keywords for unfamiliar terms. Next, read the study notes and use them to choose which transcript sections deserve close attention. This order prevents a long recorded lecture transcription from becoming another long document you never revisit.
The timeline connects segments to moments in the recording. Select a relevant time segment to return to the audio when it is available. Speaker labels help track turns in a seminar, but voice separation is not identity verification: “Speaker 1” does not prove who the person is. Rename or interpret speakers only when the recording itself gives reliable context.
For bilingual sessions, read the target-language passage first for orientation, then compare the source before quoting or learning a key term. Keep the lecturer's slides, reading list, and official instructions open for verification.
A practical review routine
On the first pass, write down three questions raised by the summary. On the second pass, use the transcript and timeline to answer them. On the third, turn the verified answer into your own note or flashcard. This is more active than rereading the generated output from top to bottom.
If one segment is unclear, replay only that part at a comfortable speed. If several consecutive segments are unreliable, the original recording may be too noisy or distant. In that case, rely on official course material or ask the lecturer rather than forcing certainty from poor audio.
When the file is actually a live class and you need support now, live lecture transcription is the better path. When you need two languages while the class happens, use real-time lecture translation.
Accuracy and responsible academic use
Recorded lecture transcription can mishear overlapping voices, accents, quiet questions, equations spoken aloud, proper names, and specialist terms. Never invent a missing word from context when preparing a quotation. Replay the audio, check the slide, or mark the passage as uncertain.
A transcript does not transfer ownership of the lecture. Do not publish, redistribute, or submit generated text as your own work when course rules prohibit it. Use LectMate to understand and review the material, then write your own analysis. For current processing rates and credit options, use the estimate in the sender and the pricing page.
Frequently asked questions
What file types can I upload?
The current workspace lists common formats including AAC, MP3, WAV, M4A, MOV, and MP4. The visible upload control is the source of truth because supported types may change.
What is the maximum file size?
The current maximum is 25 MB. If your file is larger, shorten or split it outside LectMate while preserving the part you are permitted to process.
Does recorded lecture transcription separate speakers?
It can produce speaker-separated timeline segments when voices can be distinguished. Speaker numbers describe turns; they do not authenticate a person's identity.
Can it translate the recording too?
Yes. Enable bilingual comparison and choose a target language. Keep the source text available for checking technical terms and quotations.
Can I close the page while it processes?
Keep the page open until the workspace confirms completion. Do not assume an upload or transcription continues after the tab is closed.
Turn the next recording into a study session
Open the LectMate workspace, choose Recording transcription, set the language and course context, then upload a permitted file no larger than the limit shown. Review the estimate before processing, and use the final timeline to verify the moments that matter.